sparkle
RECOGNISED BY FORBES TOP 200 COMPANIES
sparkle
RECOGNISED BY FORBES TOP 200 COMPANIES
sparkle
RECOGNISED BY FORBES TOP 200 COMPANIES
sparkle
RECOGNISED BY FORBES TOP 200 COMPANIES
sparkle
RECOGNISED BY FORBES TOP 200 COMPANIES
sparkle
RECOGNISED BY FORBES TOP 200 COMPANIES
sparkle
RECOGNISED BY FORBES TOP 200 COMPANIES
sparkle
RECOGNISED BY FORBES TOP 200 COMPANIES

How to Quickly Cancel Calendly Subscription

December 16, 2024
6 min read

Calendly is one of the most dominant apps among scheduling service providers, with a 21.45% market share as of 2022. Its intuitive interface and robust features make it a top choice for managing appointments and events. However, there may come a time when you no longer need the service or wish to explore alternatives. Canceling your Calendly subscription might seem daunting, but the process is straightforward when broken down into simple steps.

In this guide, we'll walk you through canceling your Calendly subscription, along with alternative options, tips for a smooth transition, and the best practices to ensure you’re fully prepared.

Steps to Quickly Cancel Your Calendly Subscription

Canceling your Calendly account is simple if you follow these steps:

1. Log in to Your Calendly Account

  • Visit the Calendly login page and enter your credentials to access your account.
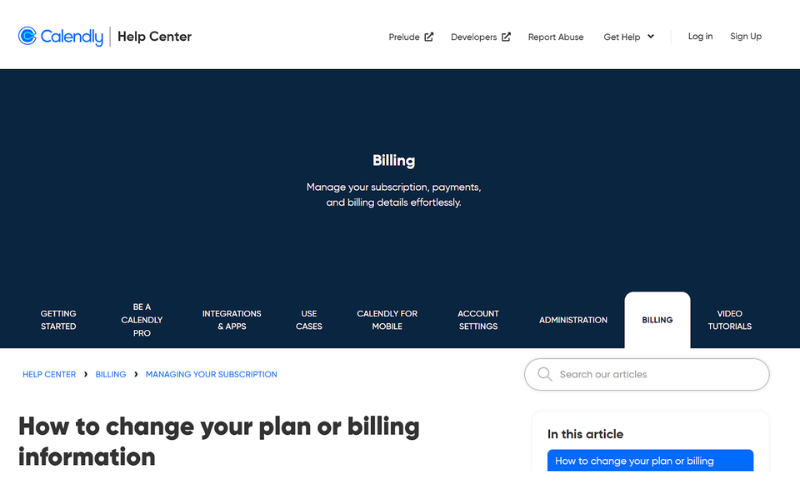
 Log in to Your Calendly Account
 Log in to Your Calendly Account

2. Access Account Settings

  • After logging in, click on the Account tab in the top-right corner and select Account Settings from the dropdown menu.
Access Account Settings

3. Navigate to Delete Account

  • Scroll to the bottom of the Account Settings page. Click the Delete Account button located in the lower-right corner.
Navigate to Delete Account

4. Select Preferences

  • Calendly may present alternatives or ask about data preferences. Choose the most suitable options.

5. Answer Deletion Questions

  • Provide feedback about your reasons for canceling.
Answer Deletion Questions

6. Confirm Deletion

  • Click the red Delete Account button to finalize the cancellation.

What Happens to Your Account Once Canceled

When you delete your Calendly account, here’s what you can expect:

  • Permanent Data Deletion: All your account information, including events and scheduling history, will be erased.
  • Access Denied: Once canceled, you will no longer be able to log in or access your data.

Pro Tip: Avoid last-minute cancellations by preparing for the transition. If you’re looking for a scheduling solution that goes beyond basic appointment management—integrating payments, event hosting, and audience engagement—SuperProfile offers a seamless all-in-one platform designed for creators and businesses.

How to Downgrade Instead of Canceling

If you find canceling your Calendly account too drastic, you can downgrade to the free plan instead. This option offers basic scheduling features without the cost.

1. Log in to Your Account

  • Follow the same steps to access your Account Settings.

2. Choose Billing Options

  • Navigate to the billing section and select the Downgrade to Free Plan option.

3. Confirm Changes

  • Finalize your downgrade to stop further charges while maintaining basic functionality.

Best Practices Before Canceling Your Calendly Account

To ensure a smooth cancellation process, follow these tips:

  • Backup Data: Download scheduled events, client information, and other data you might need later.
  • Notify Clients: Inform collaborators or clients about your platform change to avoid confusion.
  • Check Billing Cycle: Cancel before your billing date to avoid unnecessary charges.
  • Explore Alternatives: Research and test other scheduling tools to ensure a seamless transition.

What to Look for in an Alternative Scheduling Tool

When switching from Calendly, choose a tool that not only meets your scheduling needs but also enhances your ability to monetize and engage with your audience. Here’s a comparison of key features:

Avoid Common Pitfalls When Canceling

Avoid these mistakes when canceling your Calendly subscription:

  • Unexpected Charges: Cancel well before your billing cycle ends to prevent further charges.
  • Data Loss: Backup all necessary data before confirming account deletion.
  • Incomplete Cancellation: Double-check that the cancellation has been processed successfully.

Simplify Scheduling and Payments with SuperProfile

If you’re looking for a comprehensive scheduling solution that includes payment integration, event hosting, and audience engagement, SuperProfile is the perfect tool for you.

  • Payment Integration Made Simple: Accept payments for consultations, events, or digital products directly from your profile without needing third-party tools.
  • Host Events and Webinars: Organize live sessions, workshops, or webinars with integrated ticketing and attendee management for a seamless experience.
  • Sell Digital Products with Ease: Set up your storefront to sell e-books, templates, courses, or other digital offerings effortlessly.
  • Personalized One-on-One Sessions: Manage bookings for private consultations or coaching sessions with built-in scheduling and payment tools.
  • In-Depth Analytics: Gain insights into your audience’s preferences, booking trends, and product performance to make data-driven decisions.
  • Marketing Tools for Engagement: Use email and WhatsApp campaigns to promote your services, follow up with leads, and re-engage your audience efficiently.

SuperProfile combines scheduling and monetization in one user-friendly platform. Sign up for a free trial here and revolutionize how you manage your business.

Conclusion

Knowing how to cancel Calendly account is essential for anyone looking to switch platforms or simplify their scheduling needs. Whether you choose to cancel entirely or downgrade to a free plan, taking the right steps ensures a hassle-free process.

For those seeking a more robust and integrated solution, SuperProfile offers unmatched features, from scheduling and payments to audience engagement. 

Unlike Calendly, which focuses primarily on scheduling, SuperProfile combines scheduling with robust monetization tools. It’s perfect for creators who want to grow their audience, sell digital products, and build an engaged community—all while simplifying daily operations.

Ready to elevate your workflow? Sign up for SuperProfile today and take the first step toward streamlined scheduling and business growth.

How to Quickly Cancel Calendly Subscription

6 min read

Calendly is one of the most dominant apps among scheduling service providers, with a 21.45% market share as of 2022. Its intuitive interface and robust features make it a top choice for managing appointments and events. However, there may come a time when you no longer need the service or wish to explore alternatives. Canceling your Calendly subscription might seem daunting, but the process is straightforward when broken down into simple steps.

In this guide, we'll walk you through canceling your Calendly subscription, along with alternative options, tips for a smooth transition, and the best practices to ensure you’re fully prepared.

Steps to Quickly Cancel Your Calendly Subscription

Canceling your Calendly account is simple if you follow these steps:

1. Log in to Your Calendly Account

  • Visit the Calendly login page and enter your credentials to access your account.
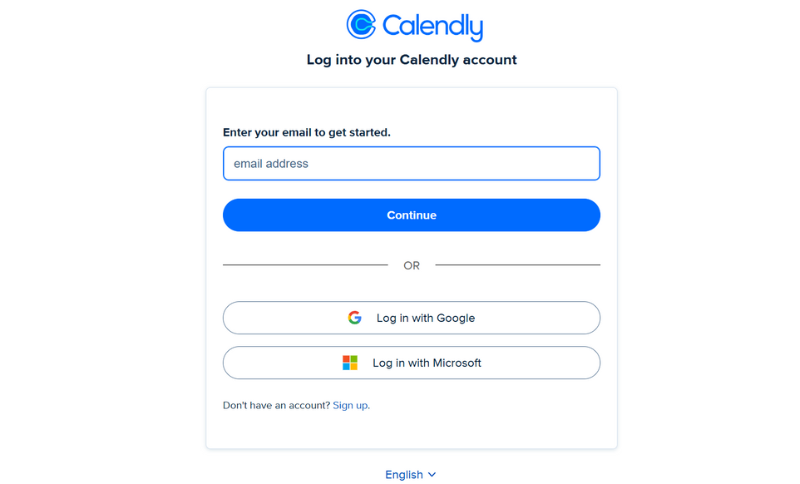
 Log in to Your Calendly Account
 Log in to Your Calendly Account

2. Access Account Settings

  • After logging in, click on the Account tab in the top-right corner and select Account Settings from the dropdown menu.
Access Account Settings

3. Navigate to Delete Account

  • Scroll to the bottom of the Account Settings page. Click the Delete Account button located in the lower-right corner.
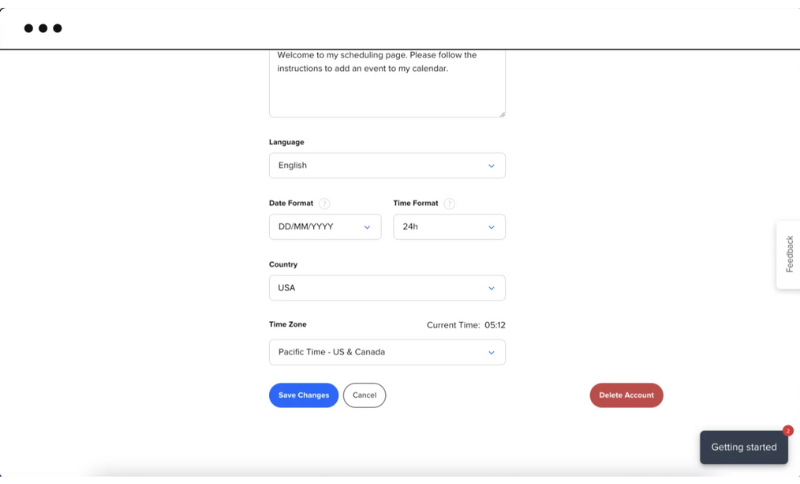
Navigate to Delete Account

4. Select Preferences

  • Calendly may present alternatives or ask about data preferences. Choose the most suitable options.

5. Answer Deletion Questions

  • Provide feedback about your reasons for canceling.
Answer Deletion Questions

6. Confirm Deletion

  • Click the red Delete Account button to finalize the cancellation.

What Happens to Your Account Once Canceled

When you delete your Calendly account, here’s what you can expect:

  • Permanent Data Deletion: All your account information, including events and scheduling history, will be erased.
  • Access Denied: Once canceled, you will no longer be able to log in or access your data.

Pro Tip: Avoid last-minute cancellations by preparing for the transition. If you’re looking for a scheduling solution that goes beyond basic appointment management—integrating payments, event hosting, and audience engagement—SuperProfile offers a seamless all-in-one platform designed for creators and businesses.

How to Downgrade Instead of Canceling

If you find canceling your Calendly account too drastic, you can downgrade to the free plan instead. This option offers basic scheduling features without the cost.

1. Log in to Your Account

  • Follow the same steps to access your Account Settings.

2. Choose Billing Options

  • Navigate to the billing section and select the Downgrade to Free Plan option.

3. Confirm Changes

  • Finalize your downgrade to stop further charges while maintaining basic functionality.

Best Practices Before Canceling Your Calendly Account

To ensure a smooth cancellation process, follow these tips:

  • Backup Data: Download scheduled events, client information, and other data you might need later.
  • Notify Clients: Inform collaborators or clients about your platform change to avoid confusion.
  • Check Billing Cycle: Cancel before your billing date to avoid unnecessary charges.
  • Explore Alternatives: Research and test other scheduling tools to ensure a seamless transition.

What to Look for in an Alternative Scheduling Tool

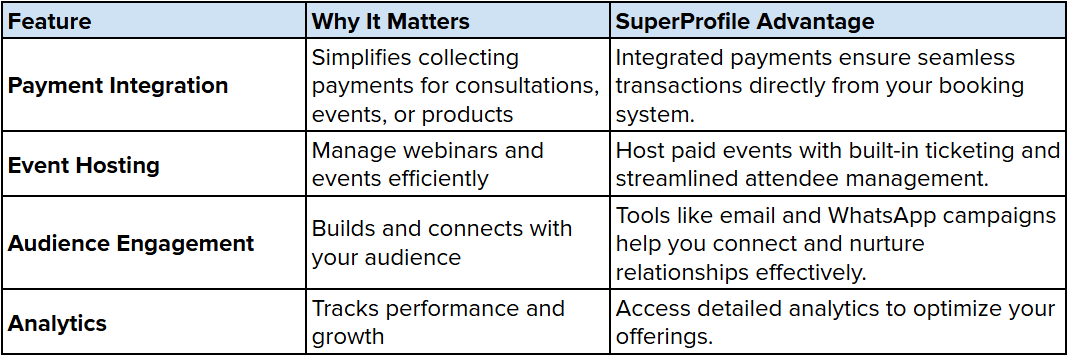
When switching from Calendly, choose a tool that not only meets your scheduling needs but also enhances your ability to monetize and engage with your audience. Here’s a comparison of key features:
Avoid Common Pitfalls When Canceling

Avoid these mistakes when canceling your Calendly subscription:

  • Unexpected Charges: Cancel well before your billing cycle ends to prevent further charges.
  • Data Loss: Backup all necessary data before confirming account deletion.
  • Incomplete Cancellation: Double-check that the cancellation has been processed successfully.

Simplify Scheduling and Payments with SuperProfile

If you’re looking for a comprehensive scheduling solution that includes payment integration, event hosting, and audience engagement, SuperProfile is the perfect tool for you.

  • Payment Integration Made Simple: Accept payments for consultations, events, or digital products directly from your profile without needing third-party tools.
  • Host Events and Webinars: Organize live sessions, workshops, or webinars with integrated ticketing and attendee management for a seamless experience.
  • Sell Digital Products with Ease: Set up your storefront to sell e-books, templates, courses, or other digital offerings effortlessly.
  • Personalized One-on-One Sessions: Manage bookings for private consultations or coaching sessions with built-in scheduling and payment tools.
  • In-Depth Analytics: Gain insights into your audience’s preferences, booking trends, and product performance to make data-driven decisions.
  • Marketing Tools for Engagement: Use email and WhatsApp campaigns to promote your services, follow up with leads, and re-engage your audience efficiently.

SuperProfile combines scheduling and monetization in one user-friendly platform. Sign up for a free trial here and revolutionize how you manage your business.

Conclusion

Knowing how to cancel Calendly account is essential for anyone looking to switch platforms or simplify their scheduling needs. Whether you choose to cancel entirely or downgrade to a free plan, taking the right steps ensures a hassle-free process.

For those seeking a more robust and integrated solution, SuperProfile offers unmatched features, from scheduling and payments to audience engagement. 

Unlike Calendly, which focuses primarily on scheduling, SuperProfile combines scheduling with robust monetization tools. It’s perfect for creators who want to grow their audience, sell digital products, and build an engaged community—all while simplifying daily operations.

Ready to elevate your workflow? Sign up for SuperProfile today and take the first step toward streamlined scheduling and business growth.

Share
Features SuperProfile SquareSpace SITE123 Webflow Weebly
Ease of Use Very easy drag-and-drop editor Easy drag-and-drop interface Very user-friendly, fast setup Moderately easy, CMS-like interface Very easy drag-and-drop interface
Customisation Options High, with various customisable templates High, with numerous templates Limited, but sufficient for beginners Very high, advanced custom code Moderate, with basic design options
Responsive Design Fully responsive, mobile-friendly templates Fully responsive templates Fully responsive templates Fully responsive templates Fully responsive templates
eCommerce Capabilities Basic eCommerce features Comprehensive (inventory, payments) Basic eCommerce tools Advanced eCommerce functionalities Basic eCommerce tools
SEO Tools Integrated SEO tools Built-in SEO tools Basic SEO tools Comprehensive SEO features Basic SEO tools
Blogging Functionality Basic blogging features Full blogging platform Limited blogging features Advanced blogging capabilities Robust blogging tools
Social Media Integration Integrated social media tools Integrated social media tools Social media buttons available Extensive integration options Basic social sharing options
Custom Code Editing No No No Yes, full custom code access No
Multilingual Support No Yes Yes Yes, but requires customisation No
Templates Variety Moderate variety Wide variety for different niches Limited, but useful for basic sites Extensive, highly customisable Moderate variety
Animation Capabilities Basic animations Basic animations No Advanced animation features Limited animation options
Analytics and Performance Monitoring Integrated analytics tools Built-in analytics tools Basic performance analytics Advanced analytics and customisable Basic analytics tools
Support Availability 24/7 customer support 24/7 customer support 24/7 customer support Extensive support resources Email and chat support
Pricing Tiers Affordable pricing plans Moderate to high Affordable, with ad-free plans Moderate to high, based on features Affordable, with free and paid plans
Domain Registration No Yes, with custom domains Yes, with custom domains Yes, with custom domains Yes, includes domain registration
Third-Party Application Support Moderate integrations available Limited integrations Limited integrations Extensive integrations available Good third-party app support
Free Plan Availability No No Yes, with limitations No Yes, with limited features
Best For Versatile and modern site-building Beginners wanting design flexibility Quick and simple website building Advanced users, complex sites Simplicity and ease of use