sparkle
RECOGNISED BY FORBES TOP 200 COMPANIES
sparkle
RECOGNISED BY FORBES TOP 200 COMPANIES
sparkle
RECOGNISED BY FORBES TOP 200 COMPANIES
sparkle
RECOGNISED BY FORBES TOP 200 COMPANIES
sparkle
RECOGNISED BY FORBES TOP 200 COMPANIES
sparkle
RECOGNISED BY FORBES TOP 200 COMPANIES
sparkle
RECOGNISED BY FORBES TOP 200 COMPANIES
sparkle
RECOGNISED BY FORBES TOP 200 COMPANIES

Setting Up and Customizing a Discord Server

December 5, 2024
7 min read

With over 200 million monthly users, Discord has rapidly grown into one of the leading platforms for creating thriving, dynamic communities where conversations flourish, ideas are shared, and connections are strengthened. Even as recently as April 2024, Discord received over 991 million users worldwide. A Discord server, perhaps the most popular way of using Discord, can be a vital community hub, a brand identity, and a platform for interaction. A well-crafted server, tailored to its purpose, can improve the engagement you have with your followers and leave a lasting impression on community members. 

If you’re a content creator wanting to stream online, let’s see how you can create a community on Discord. This guide will walk you through the basics of Discord server customization. 

Creating Your Discord Server

The first step to building your online community is to create a Discord server. Follow these steps to get started:

  1. Initiate the Server Creation Process
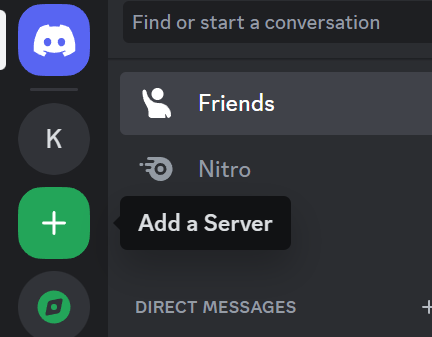
    Log in to your Discord account, and look for the green icon with a plus(+) sign on the left sidebar. Clicking this button will begin the process of creating your new server.
Creating Your Discord Server
  1. Starting from Scratch or Using a Template
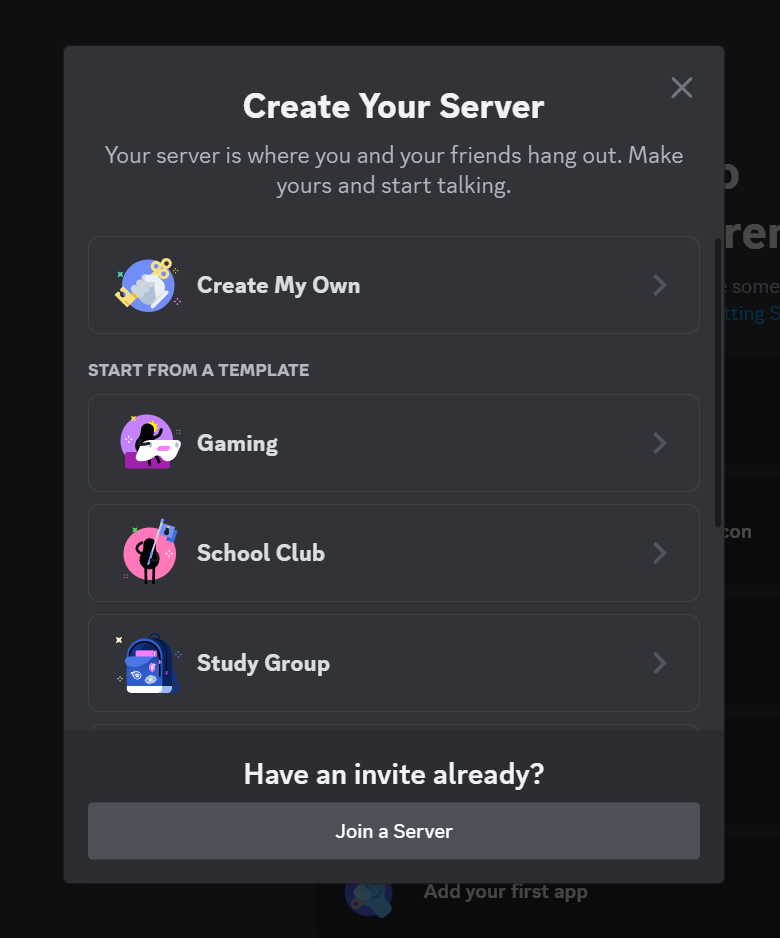
    Discord offers a selection of templates to speed up the server creation process. These templates come with pre-configured channels, roles, and sometimes even bots.

While convenient, templates may not offer the exact level of customization you need. For instance, if there are specific server theme colors or custom roles that you want to add.  If you have a specific vision like this for your server, it’s best to start from scratch to maintain full control.
Creating Your Discord Server
  1. Choosing the Right Name and Icon
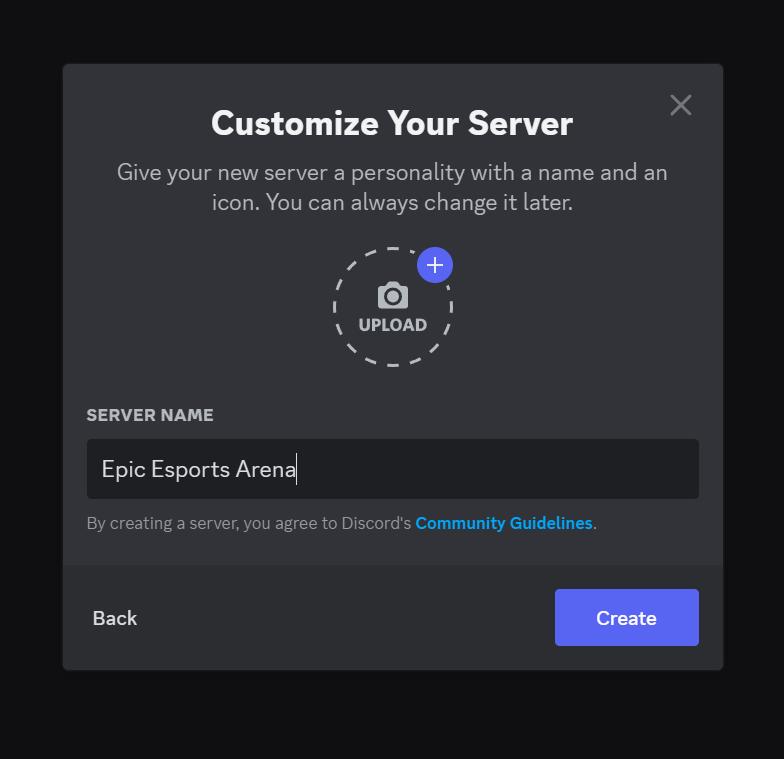
    A server’s name is its first impression. Choose a name that reflects the theme, purpose, or vibe of your community. For example, a gaming server might be called "Epic Esports Arena," while a book club could opt for "The Literary Lounge."

    Next, select an icon that represents your community. Whether it’s a mascot, logo, or relevant image, ensure it’s visually appealing and recognizable. Upload this image before proceeding to create your server.
Creating Your Discord Server

Structuring Your Server with Channels

Channels are the most vital part of any Discord server customization. They serve as dedicated spaces for different types of conversations and activities and can be independently monitored and accessed. There are two primary types of channels:

  • Text Channels: These are for text-based discussions, announcements, and sharing information. You can use them to create forums for specific topics, share updates, or simply chat with your community.

  • Voice Channels: These are for real-time voice communication. Members can join voice channels to talk to each other, listen to music, or participate in voice-based activities. Users or admins can also stream video once they’ve logged into the voice channel. 

Organizing Your Server with Categories

To prevent your Discord server customization from becoming a chaotic mess of channels, it's essential to organize them effectively. This is where categories come into play. Categories are essentially folders for your channels. They allow you to group related channels together, making it easier for members to find what they're looking for. 

To create a category, follow these general steps:

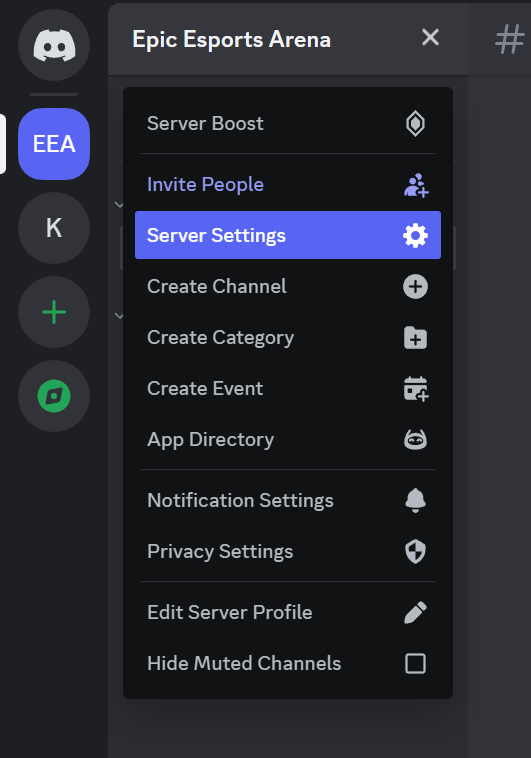
  1. Access Server Settings: Navigate to your server settings.
Organizing Your Server with Categories

  1. Create a New Category: Within your server, look for the option to add a new category,
Organizing Your Server with Categories

  1. Name Your Category: Once you’ve selected the “create category option,” choose a descriptive name that accurately reflects the content of the channels within it. For example, "Gaming," "Resources," "Social," or "Announcements." 
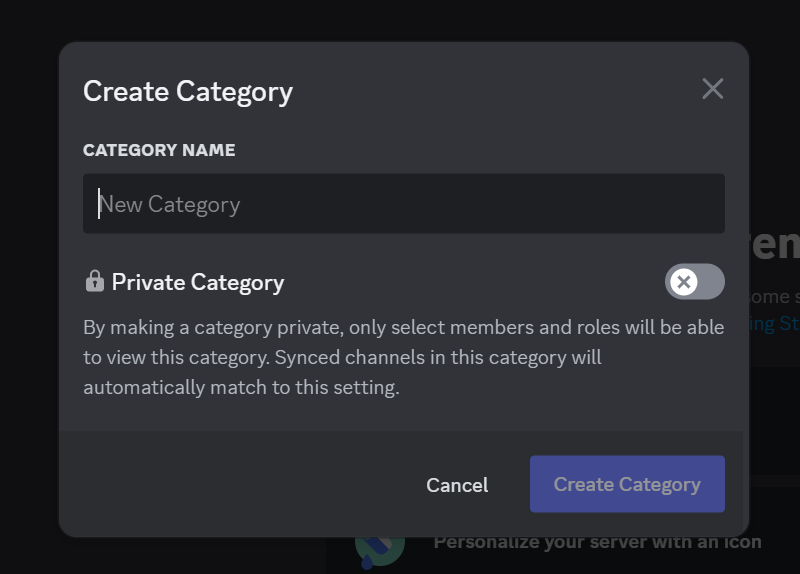
Organizing Your Server with Categories

Once you've named and created categories, you can start placing your channels within them.

  1. Drag and Drop: Most Discord interfaces allow you to drag and drop channels into specific categories.

  2. Edit Channel Settings: Alternatively, you can edit the channel settings to assign it to a category.
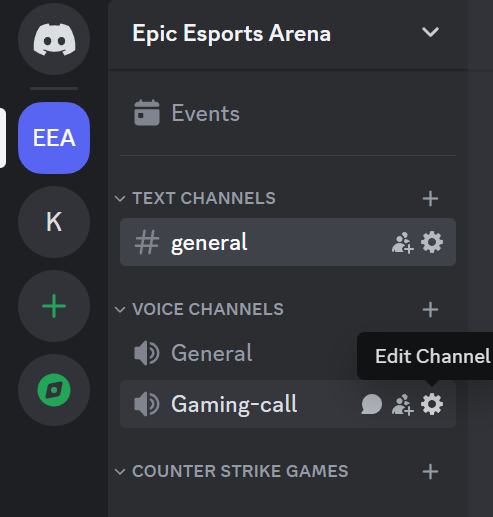
Organizing Your Server with Categories

Essential Channels

Some channels are essential for every server. These include:

  • #welcome: This is where you greet new members and provide essential information about the server.

  • #introductions: A space for members to introduce themselves to the community.

  • #rules: Clearly outline the server's rules and guidelines to maintain a positive environment.

  • #faq: A channel to answer frequently asked questions.

Defining Your Server's Aesthetic

While your Discord server's functionality is crucial, its visual appeal also plays a significant role in creating a welcoming and engaging environment. Here's how you can further customize your server's appearance:

  • Server Banner: The server banner is a large image displayed at the top of your server's home page. It's a great place to showcase your community's artwork, logos, or events. You can also use it to display important announcements or messages.

  • Invite Splashes: Invite splashes are custom images that appear when someone clicks on an invite link to your server. They can be used to promote specific events, contests, or giveaways.

  • Color Scheme: While you can’t change the overall color scheme of Discord, you can set role colors to visually differentiate between users, and customize your server banner and icons.

Establishing Order: Roles and Permissions

Roles are a fundamental aspect of Discord server customization. They allow you to establish a hierarchy amongst users to differentiate between them based on their level of access and participation. Here's how you can effectively utilize roles. 

  1. Navigate to Server Settings: Access your server's settings.
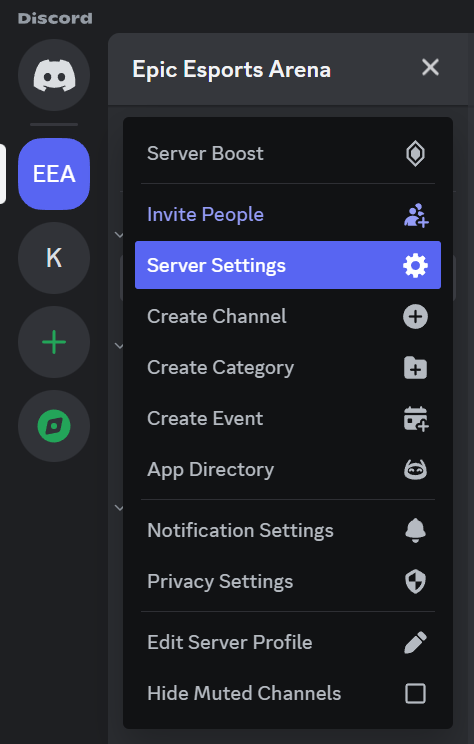
Establishing Order: Roles and Permissions

  1. Locate Roles: Find the "Roles" section within the settings.
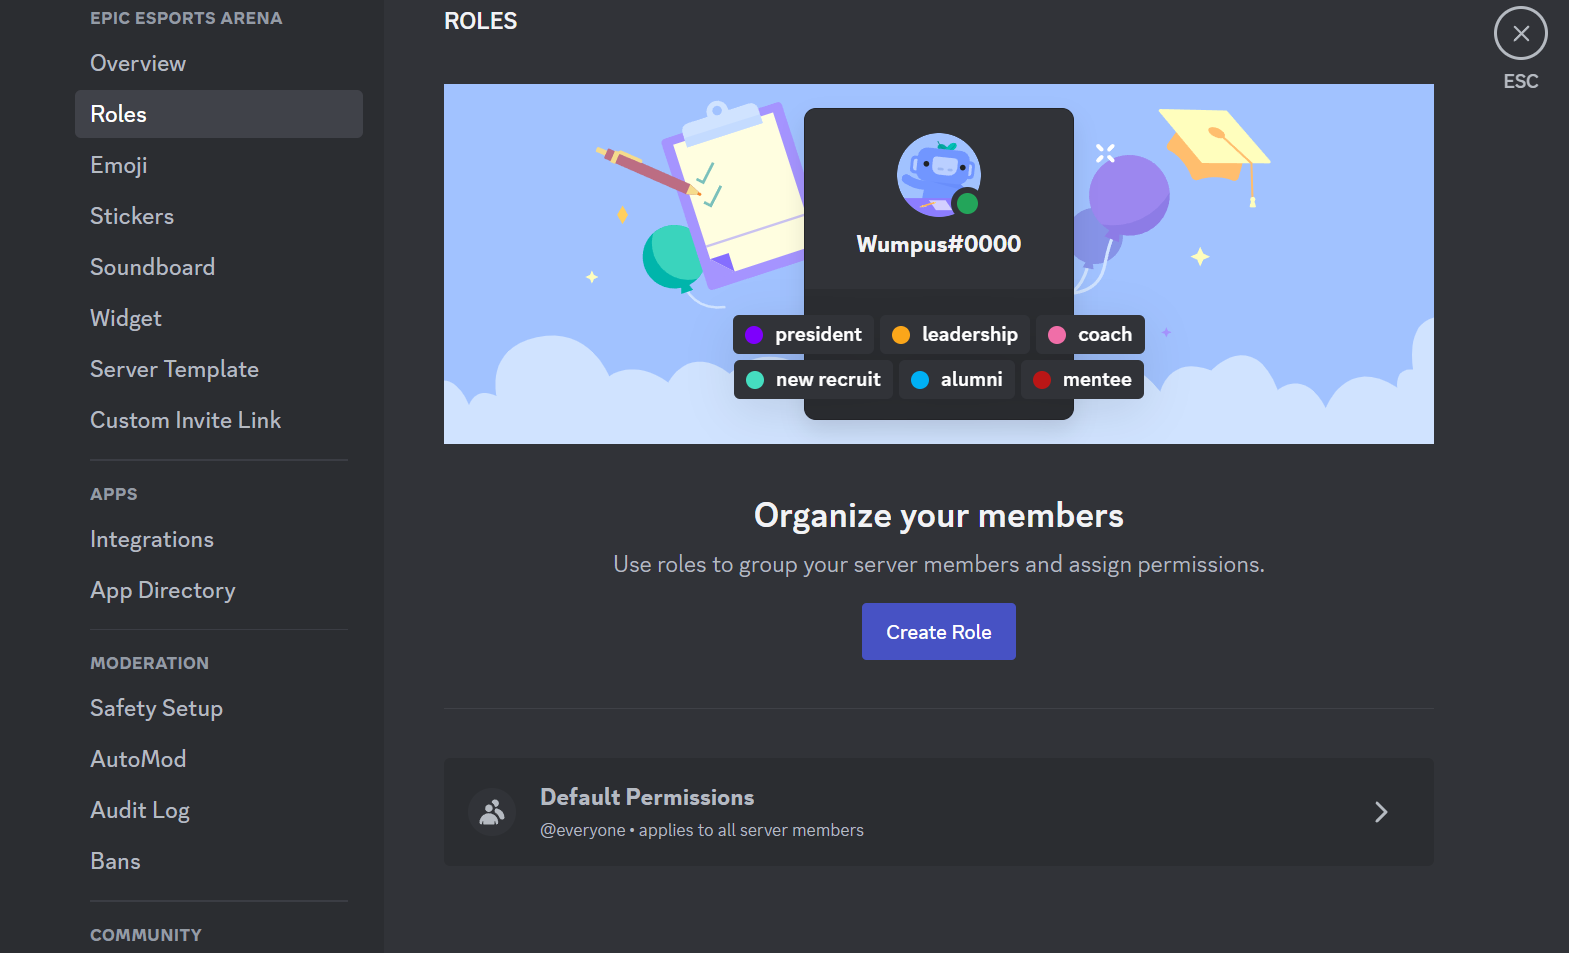
Establishing Order: Roles and Permissions
  1. Create a New Role: Add a new role by clicking the appropriate button.

  2. Customize Role Name and Color: Assign a descriptive name and color to the role to easily identify it.
Establishing Order: Roles and Permissions

Assigning Roles to Members: 

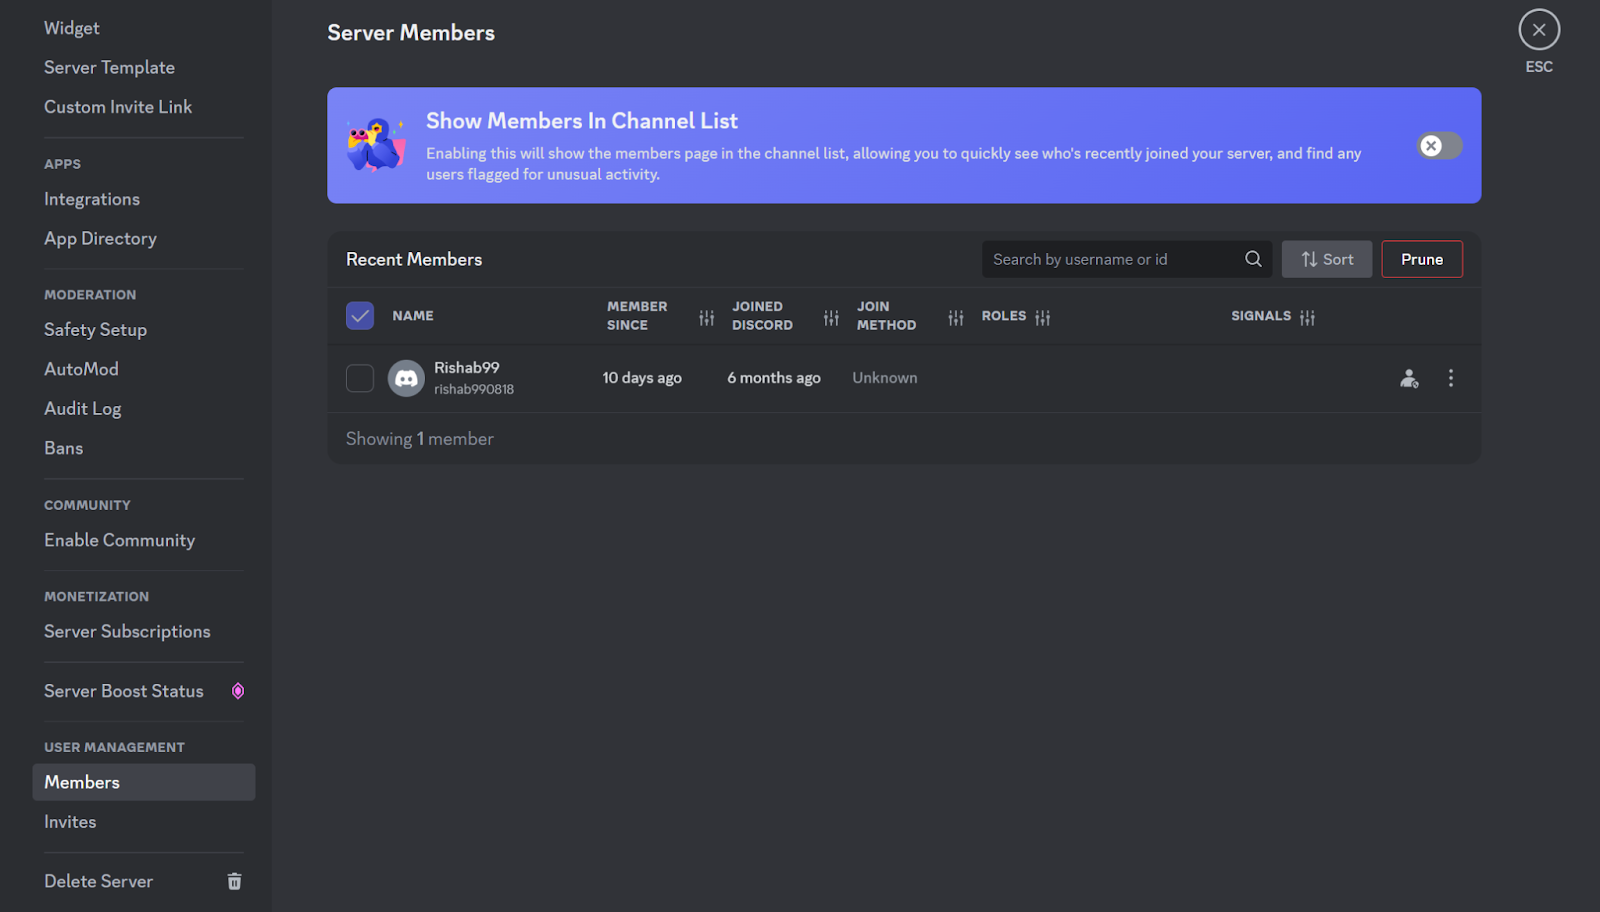
  1. Access Member List: Go to your server's member list.

  2. Select Member: Choose the member you want to assign a role to.

  3. Manage Roles: Click on the member's name to access their profile and role management options.

  4. Assign Role: Add the desired role to the member.
Establishing Order: Roles and Permissions

Defining Role Permissions: 

  1. Access Role Settings: Click on the specific role to access its settings.

  2. Manage Permissions: Customize the role's permissions by granting or denying access to channels, categories, and specific actions.
Establishing Order: Roles and Permissions

Common Role Examples: 

  • Basic Member: Default role for all new members with limited permissions.

  • Verified Member: For members who have completed verification steps.

  • Moderator: For members with increased moderation powers.

  • Admin: For server administrators with full control.

Additional Tips: 

  • Use role hierarchies to establish clear authority levels.
  • Create specific roles for different activities or channels.
  • Regularly review and adjust role permissions as needed.

Enhancing Functionality: Bots and Integrations

Discord's potential extends beyond basic text and voice channels. Bots are third-party applications that can be integrated into your server, providing a wide array of functions. From moderating your community to providing entertainment, bots can significantly enhance the overall server experience. There are bots designed for everything from automated moderation tasks like filtering spam or managing member roles to fun and engaging features such as music playback, trivia games, and custom commands. Some of the most famous bots include MEE6 for moderation and anti-spam, Groovy for adding a music experience to your server, and the Midjourney bot to enable AI media generation on your server. 

Apart from using bots, integrating other platform apps can enrich your server's ecosystem. For instance, linking your server to platforms like YouTube or Spotify allows for instant sharing of content. Members can easily share their favorite videos or create collaborative playlists, leading to a more dynamic and interactive community.

Boosting Your Discord Server with SuperProfile

SuperProfile and Discord together provide a complete toolkit for creators to grow and monetize their communities. While Discord serves as an interactive platform for real-time engagement, SuperProfile brings powerful monetization and management features that help creators streamline and expand their offerings. 

Here’s how using SuperProfile alongside Discord can enhance your community-building and revenue potential:

  • Paid Memberships and Tiered Access
    SuperProfile allows you to set up paid membership tiers within your Discord server. This feature lets you offer members exclusive content or private channels based on their subscription level, adding value to your community and giving fans a reason to subscribe.
  • Host Events and Webinars with Ease
    Hosting live events, webinars, or workshops? SuperProfile simplifies event hosting by managing ticket sales, registrations, and payments, all in one place. You can promote these events directly in your Discord server, creating a seamless experience for your community members who want to join. 
  • One Unified Storefront for All Offerings
    With SuperProfile, you can create a custom storefront that showcases all your products, services, and memberships in one place. Link your storefront in a Discord channel, like #announcements, so members have easy access to everything you offer, from digital products and courses to paid memberships and events.
  • Grow and Engage Your Community Beyond Discord
    SuperProfile offers tools like email and SMS list management, allowing you to reach your Discord community outside the platform. Stay connected with your audience by sharing updates, promoting new offerings, or inviting them to exclusive events. With SuperProfile’s analytics, you can also gain insights into your audience’s preferences, helping you tailor your offerings and grow your community engagement over time.

Why Choose SuperProfile?

Using SuperProfile with your Discord server saves time and reduces overhead costs by bundling multiple functionalities into a single platform. With secure payment processing, it allows you to manage memberships, events, and product sales effortlessly, providing a reliable and streamlined experience for both creators and their community members.

As a no-code, all-in-one platform, SuperProfile is designed to be user-friendly and accessible, requiring no prior technical expertise. 

Conclusion

Customizing your Discord server unlocks powerful opportunities for building community, strengthening your brand, and driving engagement. With well-organized channels, clear roles, and useful integrations, you can create an engaging space that truly resonates with your members. And as your server grows, additional tools like SuperProfile make it easy to manage memberships, events, and monetization—all in one place.

Ready to elevate your Discord community and simplify your growth? 

Whether you’re enhancing community engagement or creating exclusive content, SuperProfile helps you build a thriving, sustainable community with ease.

Start growing your community today with SuperProfile’s all-in-one platform! Get started with a free trial and explore the tools to connect, engage, and monetize like never before!

Setting Up and Customizing a Discord Server

7 min read

With over 200 million monthly users, Discord has rapidly grown into one of the leading platforms for creating thriving, dynamic communities where conversations flourish, ideas are shared, and connections are strengthened. Even as recently as April 2024, Discord received over 991 million users worldwide. A Discord server, perhaps the most popular way of using Discord, can be a vital community hub, a brand identity, and a platform for interaction. A well-crafted server, tailored to its purpose, can improve the engagement you have with your followers and leave a lasting impression on community members. 

If you’re a content creator wanting to stream online, let’s see how you can create a community on Discord. This guide will walk you through the basics of Discord server customization. 

Creating Your Discord Server

The first step to building your online community is to create a Discord server. Follow these steps to get started:

  1. Initiate the Server Creation Process
    Log in to your Discord account, and look for the green icon with a plus(+) sign on the left sidebar. Clicking this button will begin the process of creating your new server.
Creating Your Discord Server
  1. Starting from Scratch or Using a Template
    Discord offers a selection of templates to speed up the server creation process. These templates come with pre-configured channels, roles, and sometimes even bots.

While convenient, templates may not offer the exact level of customization you need. For instance, if there are specific server theme colors or custom roles that you want to add.  If you have a specific vision like this for your server, it’s best to start from scratch to maintain full control.

Creating Your Discord Server
  1. Choosing the Right Name and Icon
    A server’s name is its first impression. Choose a name that reflects the theme, purpose, or vibe of your community. For example, a gaming server might be called "Epic Esports Arena," while a book club could opt for "The Literary Lounge."

    Next, select an icon that represents your community. Whether it’s a mascot, logo, or relevant image, ensure it’s visually appealing and recognizable. Upload this image before proceeding to create your server.
Creating Your Discord Server

Structuring Your Server with Channels

Channels are the most vital part of any Discord server customization. They serve as dedicated spaces for different types of conversations and activities and can be independently monitored and accessed. There are two primary types of channels:

  • Text Channels: These are for text-based discussions, announcements, and sharing information. You can use them to create forums for specific topics, share updates, or simply chat with your community.

  • Voice Channels: These are for real-time voice communication. Members can join voice channels to talk to each other, listen to music, or participate in voice-based activities. Users or admins can also stream video once they’ve logged into the voice channel. 

Organizing Your Server with Categories

To prevent your Discord server customization from becoming a chaotic mess of channels, it's essential to organize them effectively. This is where categories come into play. Categories are essentially folders for your channels. They allow you to group related channels together, making it easier for members to find what they're looking for. 

To create a category, follow these general steps:

  1. Access Server Settings: Navigate to your server settings.
Organizing Your Server with Categories

  1. Create a New Category: Within your server, look for the option to add a new category,
Organizing Your Server with Categories

  1. Name Your Category: Once you’ve selected the “create category option,” choose a descriptive name that accurately reflects the content of the channels within it. For example, "Gaming," "Resources," "Social," or "Announcements." 
Organizing Your Server with Categories

Once you've named and created categories, you can start placing your channels within them.

  1. Drag and Drop: Most Discord interfaces allow you to drag and drop channels into specific categories.

  2. Edit Channel Settings: Alternatively, you can edit the channel settings to assign it to a category.
Organizing Your Server with Categories

Essential Channels

Some channels are essential for every server. These include:

  • #welcome: This is where you greet new members and provide essential information about the server.

  • #introductions: A space for members to introduce themselves to the community.

  • #rules: Clearly outline the server's rules and guidelines to maintain a positive environment.

  • #faq: A channel to answer frequently asked questions.

Defining Your Server's Aesthetic

While your Discord server's functionality is crucial, its visual appeal also plays a significant role in creating a welcoming and engaging environment. Here's how you can further customize your server's appearance:

  • Server Banner: The server banner is a large image displayed at the top of your server's home page. It's a great place to showcase your community's artwork, logos, or events. You can also use it to display important announcements or messages.

  • Invite Splashes: Invite splashes are custom images that appear when someone clicks on an invite link to your server. They can be used to promote specific events, contests, or giveaways.

  • Color Scheme: While you can’t change the overall color scheme of Discord, you can set role colors to visually differentiate between users, and customize your server banner and icons.

Establishing Order: Roles and Permissions

Roles are a fundamental aspect of Discord server customization. They allow you to establish a hierarchy amongst users to differentiate between them based on their level of access and participation. Here's how you can effectively utilize roles. 

  1. Navigate to Server Settings: Access your server's settings.
Establishing Order: Roles and Permissions

  1. Locate Roles: Find the "Roles" section within the settings.
Establishing Order: Roles and Permissions
  1. Create a New Role: Add a new role by clicking the appropriate button.

  2. Customize Role Name and Color: Assign a descriptive name and color to the role to easily identify it.
Establishing Order: Roles and Permissions

Assigning Roles to Members: 

  1. Access Member List: Go to your server's member list.

  2. Select Member: Choose the member you want to assign a role to.

  3. Manage Roles: Click on the member's name to access their profile and role management options.

  4. Assign Role: Add the desired role to the member.
Establishing Order: Roles and Permissions

Defining Role Permissions: 

  1. Access Role Settings: Click on the specific role to access its settings.

  2. Manage Permissions: Customize the role's permissions by granting or denying access to channels, categories, and specific actions.
Establishing Order: Roles and Permissions

Common Role Examples: 

  • Basic Member: Default role for all new members with limited permissions.

  • Verified Member: For members who have completed verification steps.

  • Moderator: For members with increased moderation powers.

  • Admin: For server administrators with full control.

Additional Tips: 

  • Use role hierarchies to establish clear authority levels.
  • Create specific roles for different activities or channels.
  • Regularly review and adjust role permissions as needed.

Enhancing Functionality: Bots and Integrations

Discord's potential extends beyond basic text and voice channels. Bots are third-party applications that can be integrated into your server, providing a wide array of functions. From moderating your community to providing entertainment, bots can significantly enhance the overall server experience. There are bots designed for everything from automated moderation tasks like filtering spam or managing member roles to fun and engaging features such as music playback, trivia games, and custom commands. Some of the most famous bots include MEE6 for moderation and anti-spam, Groovy for adding a music experience to your server, and the Midjourney bot to enable AI media generation on your server. 

Apart from using bots, integrating other platform apps can enrich your server's ecosystem. For instance, linking your server to platforms like YouTube or Spotify allows for instant sharing of content. Members can easily share their favorite videos or create collaborative playlists, leading to a more dynamic and interactive community.

Boosting Your Discord Server with SuperProfile

SuperProfile and Discord together provide a complete toolkit for creators to grow and monetize their communities. While Discord serves as an interactive platform for real-time engagement, SuperProfile brings powerful monetization and management features that help creators streamline and expand their offerings. 

Here’s how using SuperProfile alongside Discord can enhance your community-building and revenue potential:

  • Paid Memberships and Tiered Access
    SuperProfile allows you to set up paid membership tiers within your Discord server. This feature lets you offer members exclusive content or private channels based on their subscription level, adding value to your community and giving fans a reason to subscribe.
  • Host Events and Webinars with Ease
    Hosting live events, webinars, or workshops? SuperProfile simplifies event hosting by managing ticket sales, registrations, and payments, all in one place. You can promote these events directly in your Discord server, creating a seamless experience for your community members who want to join. 
  • One Unified Storefront for All Offerings
    With SuperProfile, you can create a custom storefront that showcases all your products, services, and memberships in one place. Link your storefront in a Discord channel, like #announcements, so members have easy access to everything you offer, from digital products and courses to paid memberships and events.
  • Grow and Engage Your Community Beyond Discord
    SuperProfile offers tools like email and SMS list management, allowing you to reach your Discord community outside the platform. Stay connected with your audience by sharing updates, promoting new offerings, or inviting them to exclusive events. With SuperProfile’s analytics, you can also gain insights into your audience’s preferences, helping you tailor your offerings and grow your community engagement over time.

Why Choose SuperProfile?

Using SuperProfile with your Discord server saves time and reduces overhead costs by bundling multiple functionalities into a single platform. With secure payment processing, it allows you to manage memberships, events, and product sales effortlessly, providing a reliable and streamlined experience for both creators and their community members.

As a no-code, all-in-one platform, SuperProfile is designed to be user-friendly and accessible, requiring no prior technical expertise. 

Conclusion

Customizing your Discord server unlocks powerful opportunities for building community, strengthening your brand, and driving engagement. With well-organized channels, clear roles, and useful integrations, you can create an engaging space that truly resonates with your members. And as your server grows, additional tools like SuperProfile make it easy to manage memberships, events, and monetization—all in one place.

Ready to elevate your Discord community and simplify your growth? 

Whether you’re enhancing community engagement or creating exclusive content, SuperProfile helps you build a thriving, sustainable community with ease.

Start growing your community today with SuperProfile’s all-in-one platform! Get started with a free trial and explore the tools to connect, engage, and monetize like never before!

Share
Features SuperProfile SquareSpace SITE123 Webflow Weebly
Ease of Use Very easy drag-and-drop editor Easy drag-and-drop interface Very user-friendly, fast setup Moderately easy, CMS-like interface Very easy drag-and-drop interface
Customisation Options High, with various customisable templates High, with numerous templates Limited, but sufficient for beginners Very high, advanced custom code Moderate, with basic design options
Responsive Design Fully responsive, mobile-friendly templates Fully responsive templates Fully responsive templates Fully responsive templates Fully responsive templates
eCommerce Capabilities Basic eCommerce features Comprehensive (inventory, payments) Basic eCommerce tools Advanced eCommerce functionalities Basic eCommerce tools
SEO Tools Integrated SEO tools Built-in SEO tools Basic SEO tools Comprehensive SEO features Basic SEO tools
Blogging Functionality Basic blogging features Full blogging platform Limited blogging features Advanced blogging capabilities Robust blogging tools
Social Media Integration Integrated social media tools Integrated social media tools Social media buttons available Extensive integration options Basic social sharing options
Custom Code Editing No No No Yes, full custom code access No
Multilingual Support No Yes Yes Yes, but requires customisation No
Templates Variety Moderate variety Wide variety for different niches Limited, but useful for basic sites Extensive, highly customisable Moderate variety
Animation Capabilities Basic animations Basic animations No Advanced animation features Limited animation options
Analytics and Performance Monitoring Integrated analytics tools Built-in analytics tools Basic performance analytics Advanced analytics and customisable Basic analytics tools
Support Availability 24/7 customer support 24/7 customer support 24/7 customer support Extensive support resources Email and chat support
Pricing Tiers Affordable pricing plans Moderate to high Affordable, with ad-free plans Moderate to high, based on features Affordable, with free and paid plans
Domain Registration No Yes, with custom domains Yes, with custom domains Yes, with custom domains Yes, includes domain registration
Third-Party Application Support Moderate integrations available Limited integrations Limited integrations Extensive integrations available Good third-party app support
Free Plan Availability No No Yes, with limitations No Yes, with limited features
Best For Versatile and modern site-building Beginners wanting design flexibility Quick and simple website building Advanced users, complex sites Simplicity and ease of use